This article covers getting set up with a pi pico w and running a blink program, pwm generation, and connecting to wifi to POST a microservice.
First, setup your development environment. Install Thonny
and under tools, in the options, in the Interpreter section, set the interpreter to MicroPython (Raspberry Pi Pico), and after holding BOOTSEL on your board, click the Install or Update MicroPython link in the bottom right of the window. Select the latest MicroPython for the Pi Pico W/WH and hit install. Alternatively you can download or build a uf2 file from the page
for this board and copy it to the filesystem for the board, it should install itself automatically.
The W version of the board does not have the led on pin 25, it has been placed on a pin connected to the wireless module. The MicroPython build for the Pico W board accomodates this with some compiler magic and a virtualized pin. Here are the three lines of code you need to blink the LED on the pico:
from machine import Pin, Timer

led = Pin("LED", Pin.OUT)
Timer().init(freq=1, mode=Timer.PERIODIC, callback=lambda t: led.toggle())
You ought to be able to save this to main.py on your board using Thonny and immediately see it running.
If the C SDK is installed, the following example (copied here for posterity and to stave off the dead internet,) gives further insight into what’s actually going on with the simulated “LED” pin.
#include "pico/stdlib.h"
#include "pico/cyw43_arch.h"

int main() {
    stdio_init_all();
    if (cyw43_arch_init()) {
        printf("WiFi init failed");
        return -1;
    }
    while (true) {
        cyw43_arch_gpio_put(CYW43_WL_GPIO_LED_PIN, 1);
        sleep_ms(250);
        cyw43_arch_gpio_put(CYW43_WL_GPIO_LED_PIN, 0);
        sleep_ms(250);
    }
}
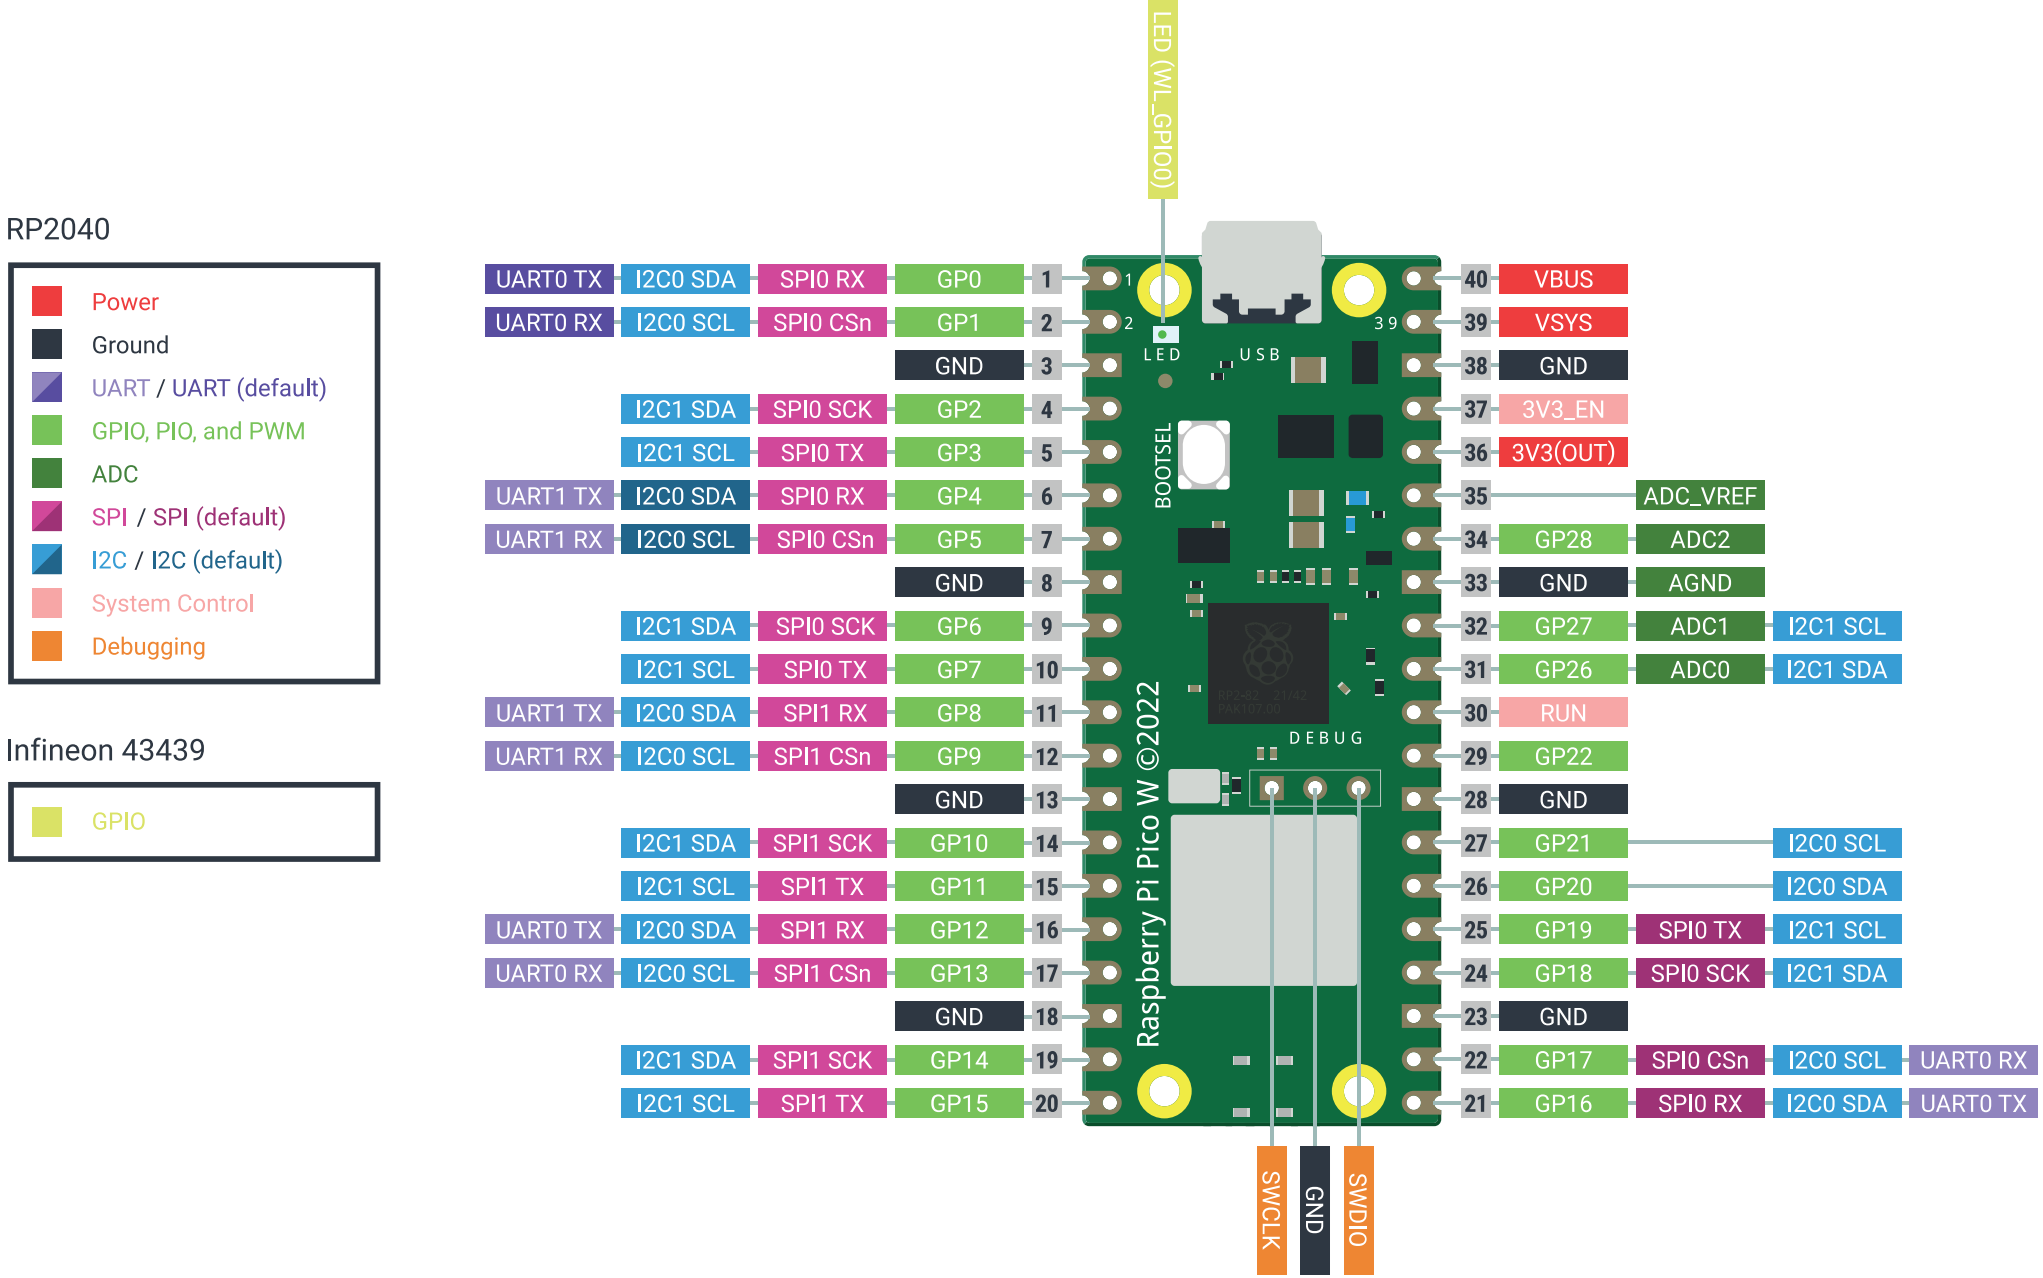
From the pinout, we can see that all of the GPIO pins are able to generate a PWM signal.
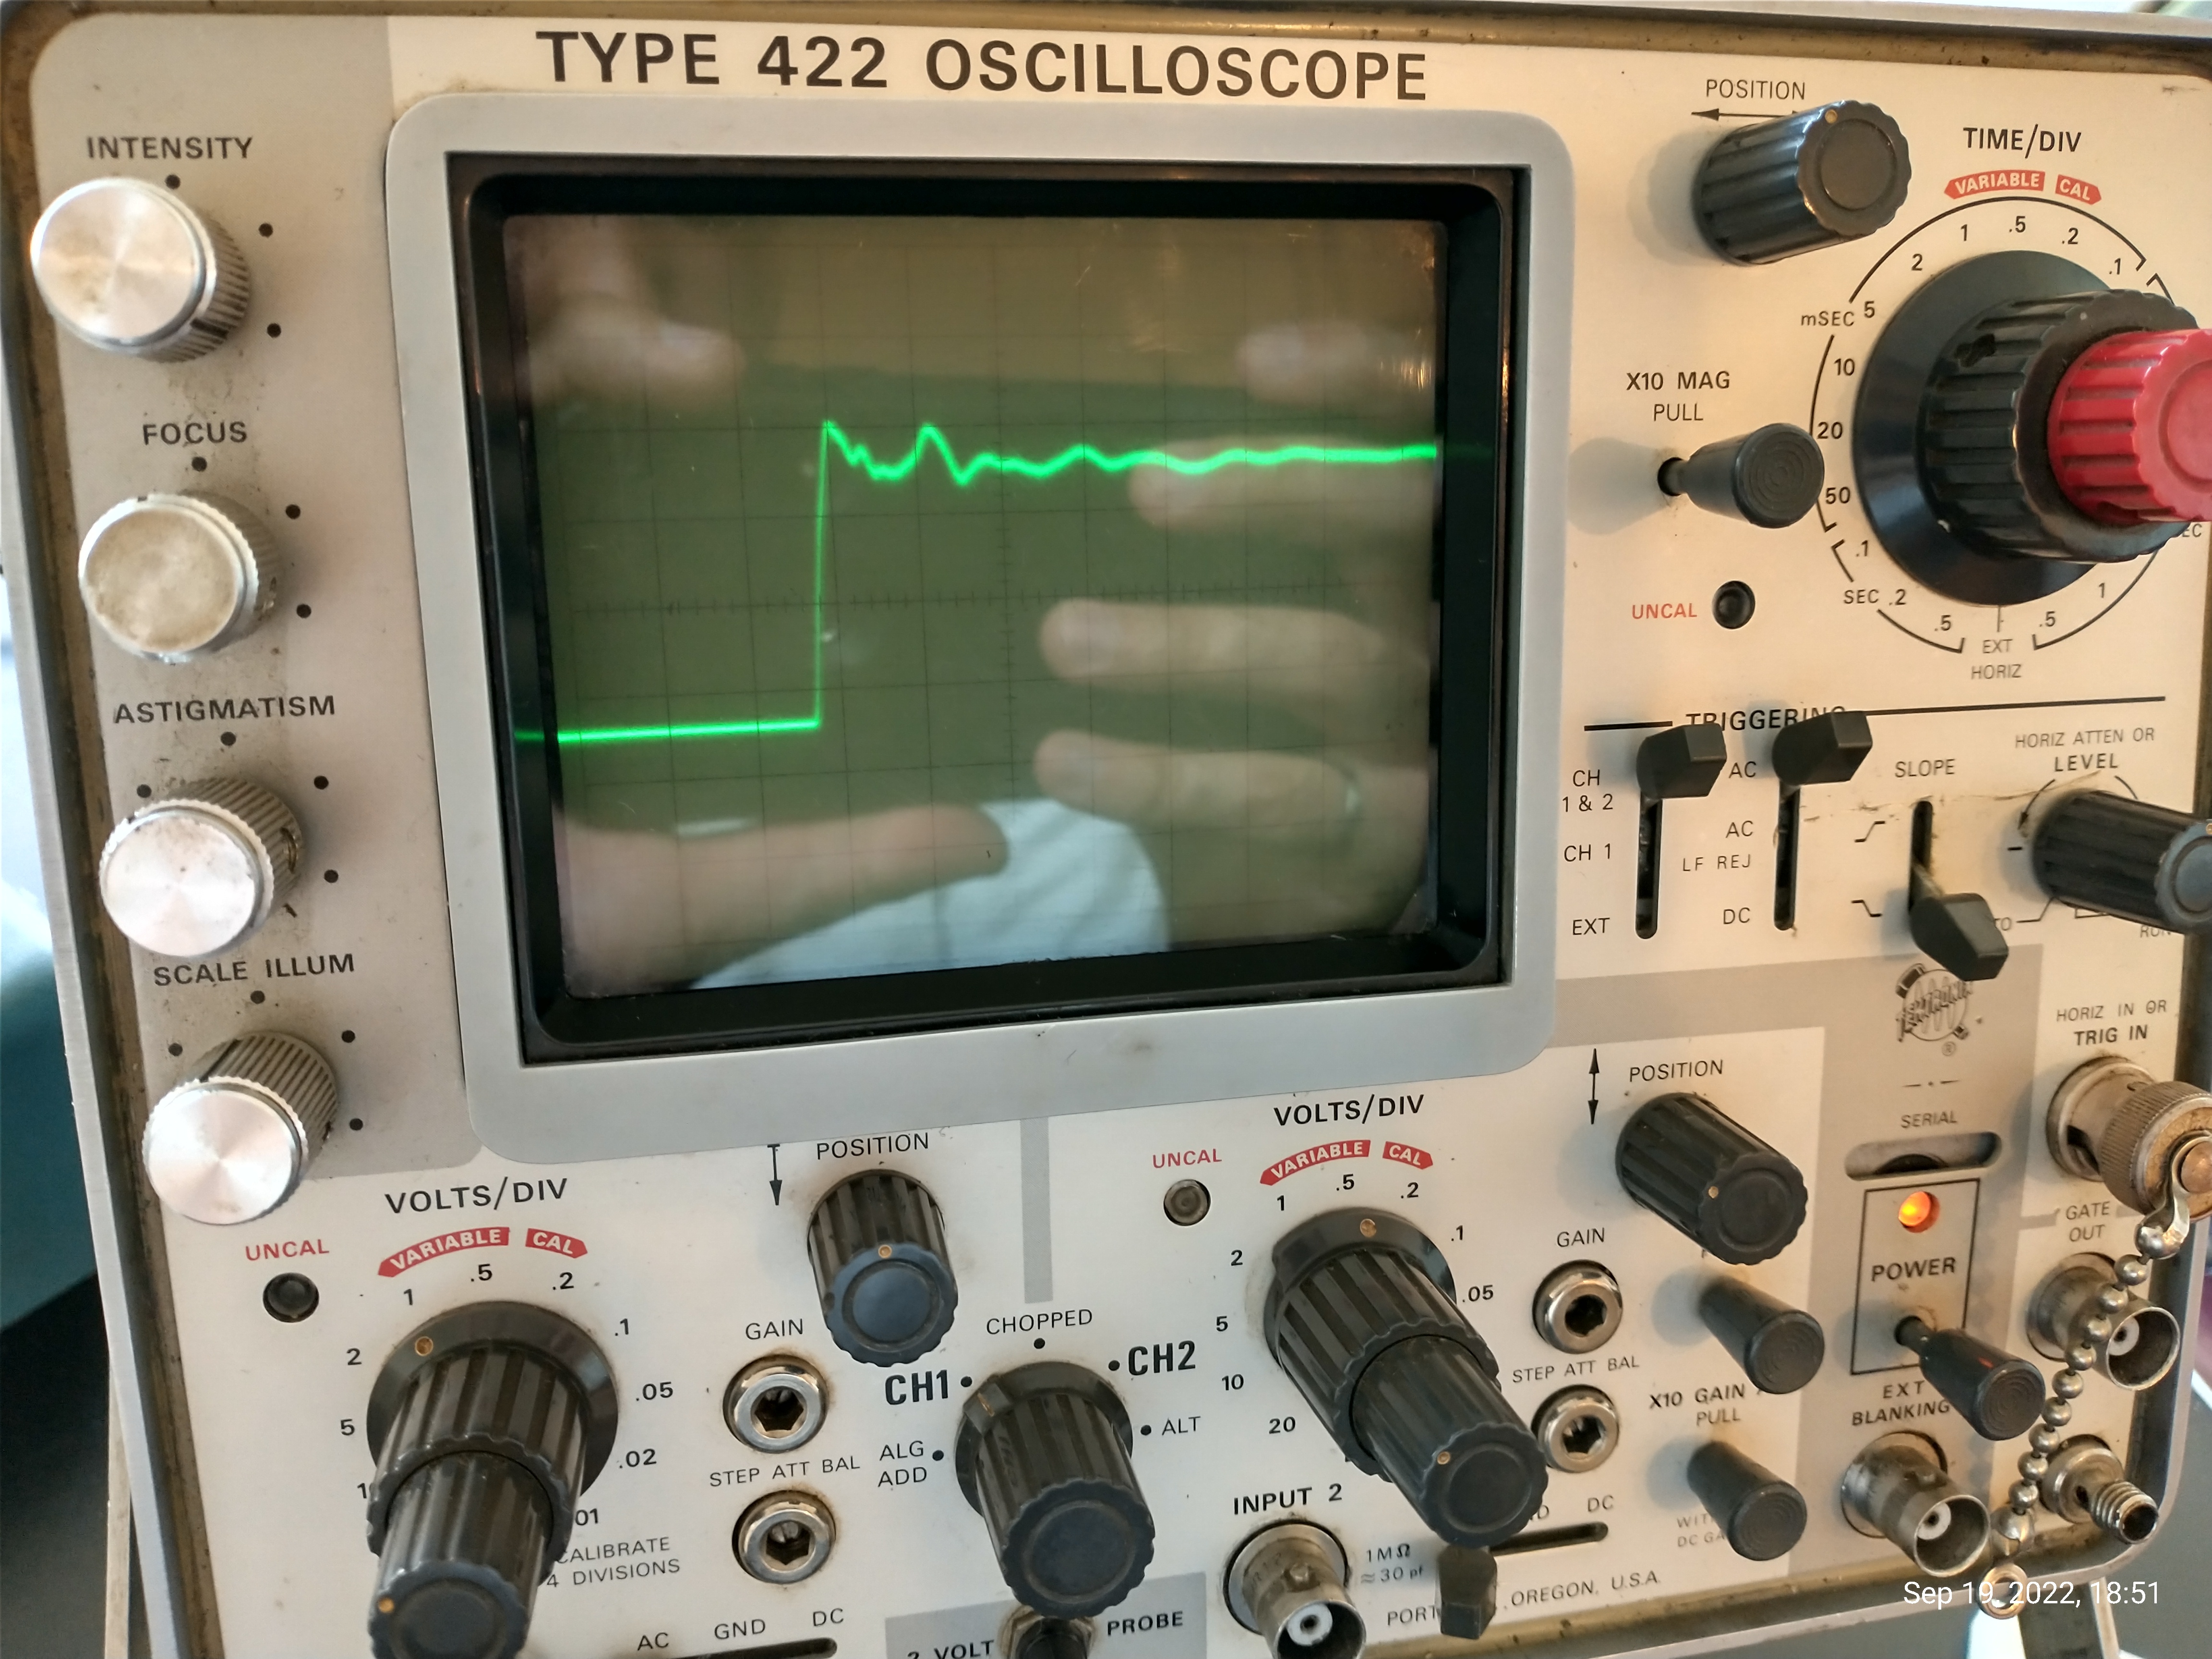
We can verify the behaviour with an oscilloscope.
from machine import Pin , PWM

pwm = PWM ( Pin ( 16 ) ) # GPIO Pin 16
pwm.freq ( 100000 ) # 100kHz PWM Frequency
pwm.duty_u16 ( int(65535/4) ) # Duty 25% (65535/4)

When producing a 100kHz square wave (one hundred thousand times a second,) the pico produces a nice looking ~3V peak to peak that stabilizes in under a microsecond.
Finally, let’s connect to the internet and ping one of our microservices. Pi Pico W boards are fantastic little IoT endpoints, and could be used for a variety of digital twin and automation applications.
- Tom’s Hardware: Connecting Pico W to the Internet
- CNX Software: Getting Started with WiFi on Pico W
- MicroPython: Memory Optimization
This is an unsafe preliminary implementation, don’t use this in any important production code. This program connects to wifi, turns the LED green while connected, and sends/recieves data from your microservice with a post endpoint at the base url every 10 seconds.
from machine import Pin, Timer
from network import WLAN, STA_IF
from urequests import post
from time import sleep
import gc

# Add your own credentials here
ssid='*************'
password='**************'

led = Pin("LED", Pin.OUT)
led.low()

wlan = WLAN(STA_IF)
wlan.active(True)
for network in wlan.scan():
        print(str(network[0]))

def connect():
    print("Connecting to network.")
    led.low()
    wlan.connect(ssid, password)
    while not wlan.isconnected():
        print("Waiting for network...")
        time.sleep(1)

    led.high() # Set LED to high if network is active


def main():
    if not wlan.isconnected():
        connect()

    ping_replit = post(
        "https://simplepicobackend.microservice.url",
        json={"it":"works!"})


# Run main on boot and every 10 seconds after that
while True:
    main()
    gc.collect()
    sleep(10)
With this, the Pico can be placed anywhere near a router and continually monitor and effect the environment around it, while being controllable from anywhere on earth with a network connection. Nifty!
In preparation for working with C++, it may be a good idea to make sure you can read debugging output over the serial port using this guide
. You may need to add yourself to the dialout
group to access ttyACM0 as non-root.
sudo usermod -a -G dialout <your user>
minicom -b 115200 -o -D /dev/ttyACM0
Plenty more Pico content is on the way. Here are some additional resources:
- PDF: Pi Pico W Datasheet
- PDF: Pi Pico W Networking